

.png)
How to Set Up A Drip Email Campaign with MailChimp
Discover drip email marketing strategies for nutrition professionals. Learn how to set up a drip marketing campaign using MailChimp.

If you’re new to email marketing, today we’re walking you through the step-by-step process of creating an automated email marketing campaign using MailChimp. One of the most powerful online tools to grow an email list and establish email marketing campaign, MailChimp is one of the top choices for wellness professionals. Learn step-by-step how you can create your MailChimp account and establish email campaigns that automatically send out to new subscribers.
MailChimp Email Marketing Guide For Nutrition Professionals
Often called a “drip” marketing campaign, what we’re referring to is a series of automated emails sent out to advertise an upcoming promotion or service available. The idea is that through a series of repetitive emails, eventually your target will open the email, read, it, and consider becoming a client.
There is a variety of content that could go in these emails, but today we’ll focus on the initial automated emails you send to new subscribers on your email list. This is a great way to gain and retain new clients for your private practice.
An automated email cadence is particularly effective because even if subscribers aren’t reading your email and are deleting it right away, seeing your name in their inbox regularly can be very beneficial.
Here’s how to set up an automated MailChimp email marketing cadence:
Step 1: Create a MailChimp Account and Login
If you are just getting started, MailChimp offers a Forever Free pricing plan that allows for up to 2,000 subscribers. This is perfect for just starting out!
Then, login to your MailChimp account.
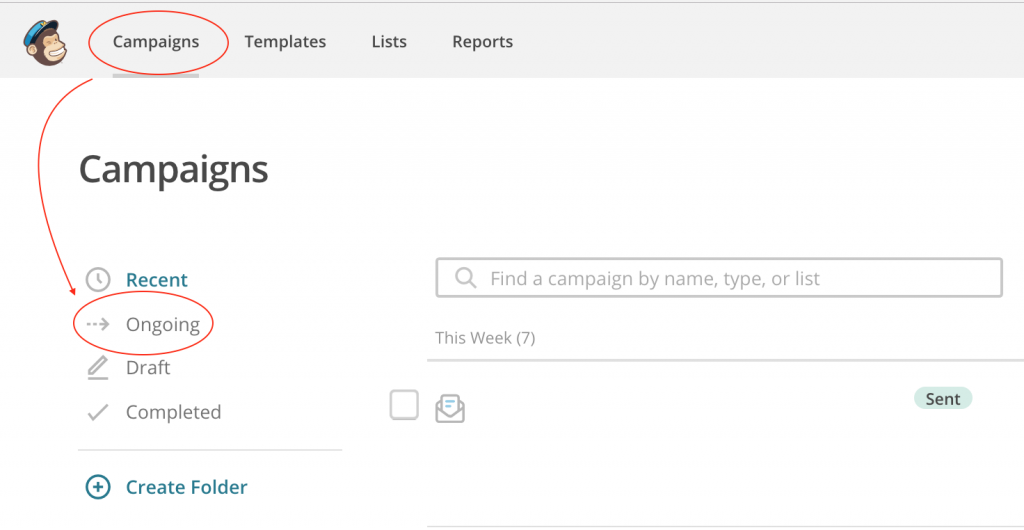
Step 2: Choose Your Ongoing Campaign
We will be working with Ongoing campaigns because automated email campaigns rely on auto-released emails. This means, there will be specific “triggers” that cause your subscribers to get your email. (More on triggers in a minute.)
Click Campaigns, then Ongoing.
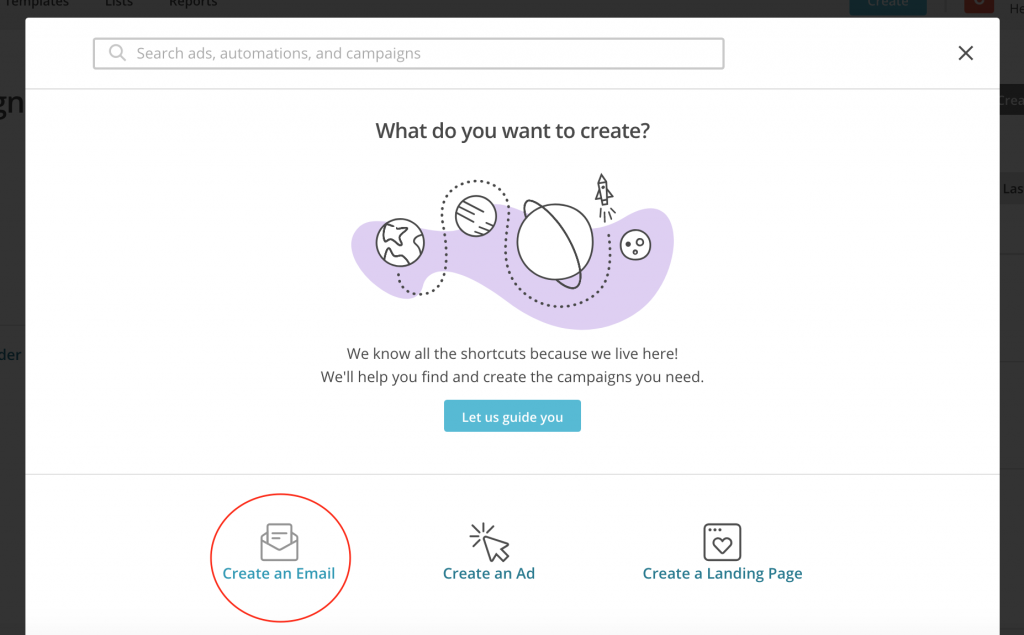
Click “Create Campaign.” MailChimp’s capabilities are extensive, so try not to get overwhelmed!
We want to send an automated campaign, so click on Create an Email >> Automated.

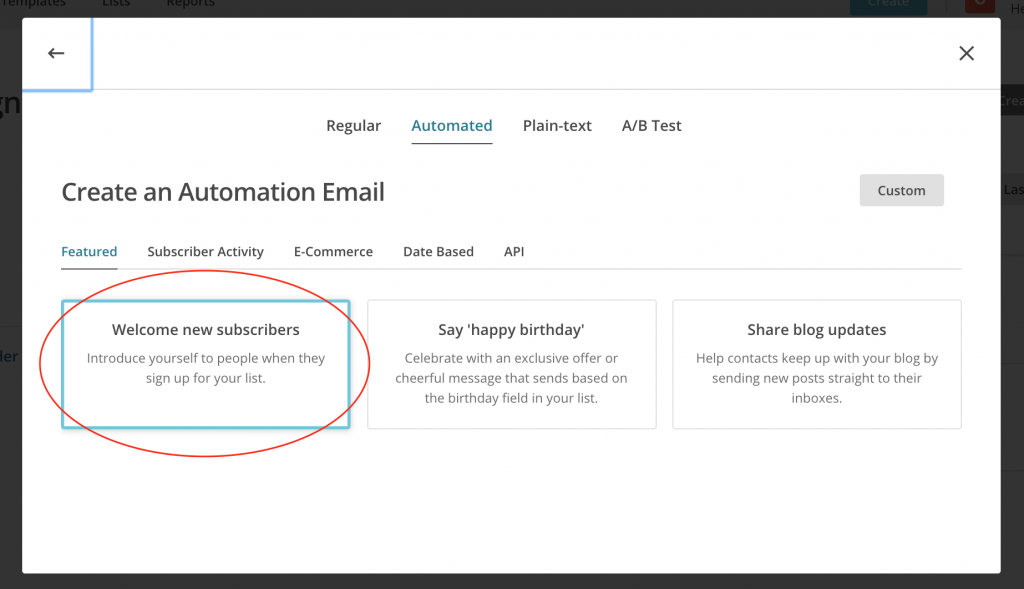
Click on “Welcome new subscribers” so you can set up a series of emails for those who just sign up for your email list.
You will then get to choose between sending a single campaign or an “Onboarding series.”
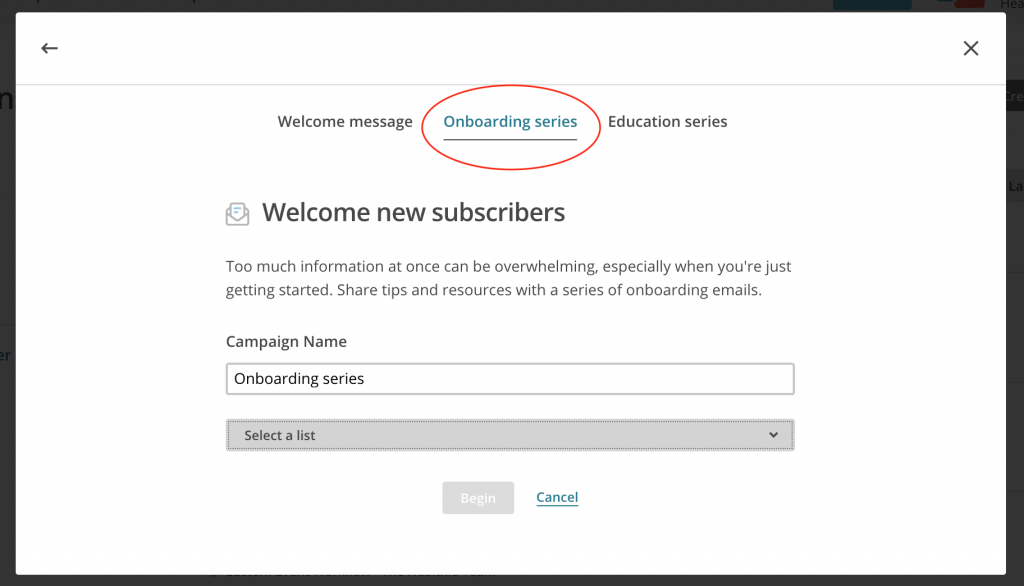
As stated in Mailchimp, “Too much information at once can be overwhelming, especially when you’re just getting started. Share tips and resources with a series of onboarding emails.”
This will let you set up a series of emails to “drip” information to your prospective clients over several days or weeks.
Enter your campaign name and then the list you want to send these emails to. You will then be redirected to the Onboarding series page, as pictured below.
Step 3: Schedule Your Onboarding Series
Once you have decided what type of drip campaign you would like to run, now you’ll have to create it! On the page you’re redirected to, you should see boxes like those pictured below:

You will see a welcome email, along with 4 other “feature” emails.
Note these important buttons:
- Edit Trigger: The trigger is the time that releases your automated email. By clicking “Edit trigger,” you may choose from MailChimp’s options so you wait a set number of hours, days, or weeks before triggering your email to be sent.
- Pro tip: We suggest setting the trigger for your welcome email to be immediately so your clients receive this email shortly after joining your email list.
- Edit Schedule: The schedule determines the days and times of day your emails can be delivered. This isn’t the exact date and time, but determines if you want to send your emails on weekday mornings, for example. You can learn more about the Schedule, here.
- Pro tip: Early morning tends to be a popular time to send out emails.
- You may choose not to send out emails on weekends – or just the opposite, only weekends. It’s up to you, and sometimes takes some experimentation.
- Design Email: This is where you can create your email so it’s ready to send out! You can customize your design or use a pre-existing template created by MailChimp.
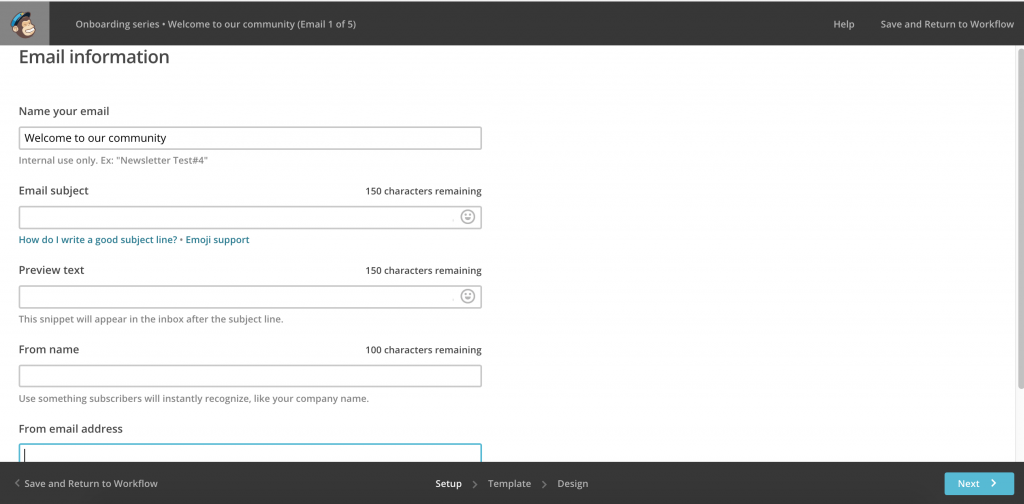
Step 4: Set Up Your Email
When you click on Design Email, you’ll see a series of information to complete before you actually design your email.
As seen below, this information includes:
- Name your email
- This is just for you to quickly reference this email. You can call these emails “Onboarding Email #1,” and so on,
- Email Subject
- Start with a good subject line! Email subject lines ideally are concise and grabbing. For instance, the subject “Eat Yourself Thin” will most likely have more success than “Have You Considered Health Coaching as a Weight-Loss Solution?”
- The reason why is simple – the first one is shorter. Luckily MailChimp will help keep you brief capping out your subject line at a total of 150 characters.
- Preview Text
- This is the 1st line of your email or a quick summary of what’s included inside.
- From Name
- Who is your email from? You or your business?
- Pro tip: Keep it personal and send your emails from a person’s name.
- From Email Address
- Use your business email address, not your personal email.
- Google Analytics title for email (If you’ve enabled Google Analytics)
- This is how you will track your email analytics, if you’ve enabled Google Analytics
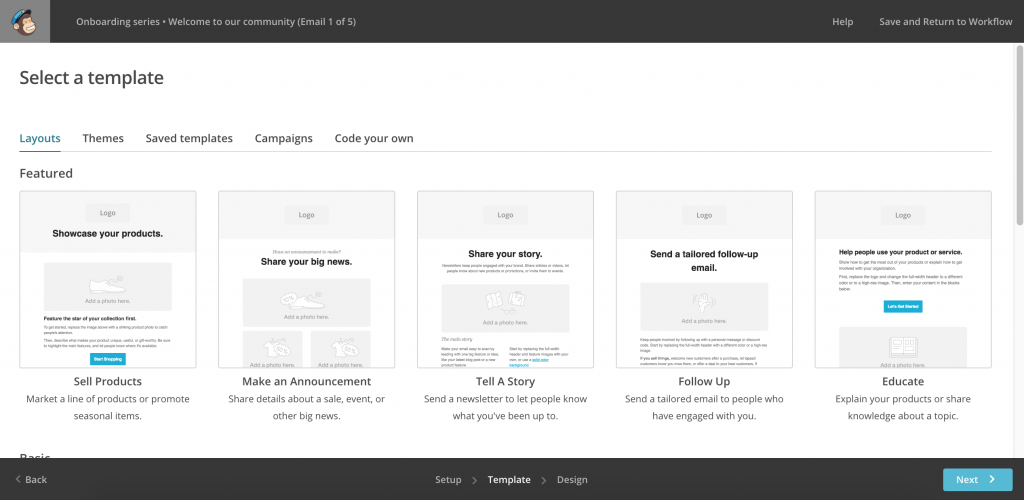
Step 5: Design Your Email
Now onto the design! MailChimp offers a variety of different templates you can choose from.
Start with your header. One of the easiest ways to make your email header pop is to create one on Canva.com! Check out their Email Header template, choose from free images and piece together a header that will really stand out! It’s an easy and effective way to show off your brand.
Then, on to the content!
The best tip we can offer: Keep it short and sweet!
While we know you’re excited to share who you are and what your practice can do for prospective clients, your email subscribers will not read a lengthy email. It will be much more effective to let your prospective clients find out about you slowly.
You want a short, concise message, so that if your email is opened, your readers walk away with some idea of what your practice is about. Your first welcome email is also a great time to deliver the premium content or opt-in you promised to secure their email in the first place!
Step 6: What To Include In Your Onboarding Emails
After your welcome email that highlights your practice or provides your lead magnet, you may feel stuck about what to send your email subscribers.
Sharing similar content in email after email is very effective. In fact, sending out the same email week after week, mixed in with a few others can be helpful! Marketing research shows that all of your email subscribers likely won’t open every email. Focusing on different options or features you offer, while having a lot of the same quick overview details, will keep your strategy from feeling too annoying but will allow for someone who hasn’t opened any past emails not to be left out or missing something.
Pro Tip: Create each email in your onboarding series as if your subscribers haven’t read any of your previous messages! If you feel like a broken record, it’s ok!
Step 7: Publish Your Email Cadence
Once you’re finished designing your email and writing the content for your first set of messages, send away! You can click through MailChimp’s navigation to launch it into action.