.png)


How to host a wellness webinar or video chat
Explore video chat features to learn how to host your own wellness webinar. Discover health and nutrition video chats with Healthie.

In nutritional care, offering group counseling sessions provides a way to reach a wider audience at once. In-person group sessions can be challenging to coordinate: from finding a location large enough to accommodate your group, paying the overhead costs and factoring in communication time. Hosting group video chat sessions or webinars provide a convenient way to reach your clients and save you both time and costs.
With Healthie’s Telehealth platform, you can schedule, enroll, bill and launch group video chats and webinars directly through your provider account. With Healthie’s integration with Zoom, all video chats (individual and group) are HIPAA-compliant and will provide a superb telehealth experience for your clients.
In this article, we’ll take you step-by-step on how to create, share and launch your first group video chat appointment.
Incorporating group video chat services into your nutrition practice
Offering group video chat sessions are a convenient way to expand your nutrition practices service. Even for insurance-based or in-person practices, virtual group sessions offer a cost-effective way to provide premium additional services.
Some ways to incorporate group video chat services:
- Generate additional income while not increasing your client load or client-facing time
- Provide general recommendations to multiple clients at once, and save time during individual-sessions to provide more tailored recommendations
- Add a support-group element to your business
- Utilize webinars (free or for a fee) to generate new client leads for your practice
- Add a group session to current client packages to increase the value and rate of your packages
For insurance-based practices, if your client’s insurance plan covers for telehealth services, you can consider billing insurance for individual clients in your group session. Otherwise, the low overhead costs of a virtual group session can allow you to offer an affordable self-pay rate for your clients that are not covered for telehealth.
No matter how you structure your practice, group video chat sessions provide an added layer of support for your clients along with the ability to reinforce topics that you typically discuss in sessions. You may want to consider building in regular support-group services, or several groups, if you work with multiple client groups. For example, if you work with clients that have eating disorders as well as weight management clients, you may want to consider offering two virtual support groups.
Pro Tip: Through Healthie, webinars can be downloaded afterwards. You can choose to host the same webinar live multiple times, or save time by including the download in a client package for a fee OR include in an online Healthie Program.
Structuring your virtual group services:
- A one-time or repeat webinar on a general topic that is relevant to your clients (ie. a 60 minute “Intuitive Eating” virtual group session or webinar every 3 months)
- Run a short-term virtual group program (ie. Diabetes 101 educational webinar series that hosts a weekly webinar for 6 weeks)
- Create a long-term, open enrollment virtual support group (ie. Eating Disorders Support Group) that you host and moderate weekly
{{free-trial-signup}}
How to launch a group video chat or webinar in Healthie
To create your virtual group services within Healthie takes a few quick steps. Once done, you’ll see your group video chat appointment(s) or webinar on your Healthie calendar. From there, you’ll be able to add your new services into your client packages to share with existing or new clients. Follow these steps to create your first successful group video chat.
Step 1. Create a new appointment type in your Healthie Calendar
To get started, navigate to the calendar appointment types in your Healthie provider account. You can find it by Calendar > More > Appointment Types > Create New Appointment.
From here, you’ll be able to create a new appointment type. Important information to include in yoru new appointment:
- Name: this will display to clients, so choose a title that is relevant and appealing
- Choose your client group: after a client books this session, you can automatically move them into any of the client groups that you’ve created within Healthie. They will receive any forms that you’ve associated with this group. Moving a client to a new group won’t delete any forms or access to documents that they currently have.
- Click “Group Appointment”
- Decide if you want clients to be able to self-enroll or if you’d prefer to manually enroll clients. If you keep “Clients Can Book” CHECKED, note that all of your Healthie clients will be able to see this appointment type. Keep this in mind if you work with different client populations and would rather not have them see this as an available appointment type (ie. Eating Disorder clients seeing a Weight Loss Support Group appointment)
- Select the length of time for your virtual group session
As a best practice, you may want to have existing clients sign off on an Informed Consent – Virtual Group Counseling form. This form should just speak to the nature of group calls, possible risks of telehealth, limited confidentiality in a group setting, expectations for the group and attendance/cancellation policies. Have your business attorney review any of your practice forms and policies to ensure that your business is following state laws.
Now that your group appointment is created, you’ll want to make sure that it is setup as a telehealth call. View all of your appointments and locate your new appointment. Click EDIT and uncheck the phone and office icons. You’ll want to leave TELEHEALTH checked only.
Step 2. Add your group video chat session or webinar to your Healthie calendar
To schedule your group sessions, navigate to your calendar and “Add Appointment.” You’ll have a host of customizations for your appointment, so be sure to scroll all the way down and carefully read the options.
- Click “Group” from the top menu
- Indicate the max amount of clients you’d like to enroll – 75 is the most you can host in a virtual group call or webinar
- Select the new group appointment type you’ve just created
- Double-check that you have TELEHEALTH selected for your contact type
- Choose your date and time
- Want you appointments to be recurring? Check off “Repeating” and indicate the interval (weekly, biweekly, monthly) and the number of sessions you’d like to include
- Keep on scrolling to select if you’d like clients to be automatically enrolled in ALL of the appointments if you’ve created a recurring group session. Otherwise clients will only be registered for the one time.
To view the details of the virtual group session you just created, click on the webinar scheduled. You will see “Your Video Link” to click to start your webinar. The “Client Video Link” is a link you can share directly with your clients to access the webinar.
If you are using group webinars as a marketing feature, you should note that a participant can join a Zoom link regardless of whether or not they are a Healthie client.
Step 3. Create a package for your group video chat sessions or webinar
The next step involves adding your group video chat or webinar to a client package. As mentioned earlier, you can add it to an existing package as an add-on appointment type, or you can create a new package. Even if you plan to offer your group session for free, create a package to easily share and track important data about your group appointment.
To create a package, navigate to Billing > Packages > Create New Package
In your package you’ll again be asked to:
- Create a title
- Add a description
- Add a video link: you may want to create a short video clip explaining what registrants can hope to achieve and the benefits they’ll receive from enrolling in your group session
- Again, think of which group you want clients to be moved to once they purchase. Choose the SAME group as you did for the appointment type
- Included items: find your new group appointment type from the options and indicate how many sessions clients will receive with this package (ie is it 6 virtual group session appointments in your 6-week course, or 1 webinar?)
Pro Tip: If you want ALL your clients to be able to see this package, be sure to check “Make Package Visible.” By default, all packages will be not-visible unless you select otherwise.
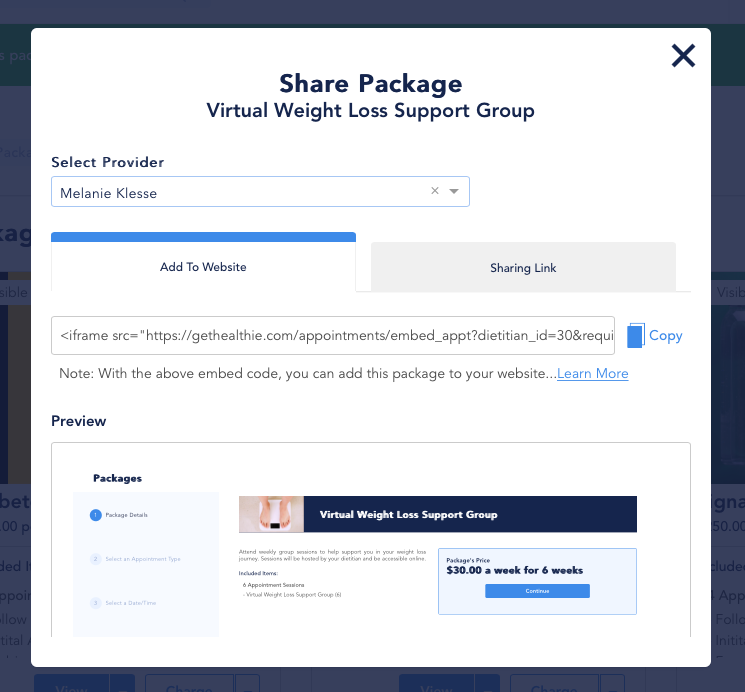
Step 4. Share your group video chat or webinar and have attendees “register”
There are two different options of how to share your package with clients. If you’re part of a multi-provider practice, you’ll have the option to select which provider you’d like the package share link to be associated with.
Get a code to embed your package into your website:
With the first share option, you’ll be able to copy an “embed” code, which can then be used to incorporate your package as part of your web page. Clients will then be able to purchase your package and book their appointment directly through your website. This offers convenient booking and will automatically create a client account within your Healthie platform
Get a sharing link for your package:
For convenient sharing of your package, you can select the second tab within the share screen to copy the “share” link (as opposed to the embed code). When you share this link and clients click on it, it will show your package in a web browser tab. They can then continue to follow the steps for filling out their contact information, billing information and book their appointments.
With either package share option, clients will be able to book the group video chat session through their package purchase. If there is only 1 appointment date that you created, clients will only be able to schedule for that day and time. Booking this appointment will automatically enroll them in your group video chat or webinar.
For more information on client packages details, including payment options and sharing information, refer to our Client Packages Feature Highlight.
Step 5. Hosting your group video chat or webinar
Launching from your computer:
When you’re ready to launch, navigate to your calendar and find your appointment. The appointment details include the link for you, as the provider to click, and also the Zoom link for your clients. On their schedules, clients will see be able to click their appointment and launch the call by clicking the included zoom link.
Launching from mobile:
If you prefer to launch your group video chat from your phone, you’ll want to make sure to download the Zoom App first. You’ll navigate to your Healthie calendar on your mobile Healthie app, and when you click “Start Video Chat,” the platform will automatically open up into Zoom.
Record Your Webinar for Marketing Purposes:
If you conduct a video chat, group session, or webinar through Zoom, you are able to record it for future access. The recording will save locally on your computer, commonly in a folder called “Zoom.” Make the most of your group video chat or webinar, here are some suggestions of what you can do with your recording:
- Send to enrolled registrants post-webinar or group chat and thank them for attending
- Follow-up and sent to registrants that couldn’t attend live so they can watch it on their own time
- Add your recording into a marketing campaign (ie. FREE webinar clients can view) to showcase your services, a special program or new product that you’re pushing
- Save your video recording(s) and add to an online program or educational series
For Healthie Members: here’s our list of resources and help articles to assist you in navigating the Client Packages platform.
Getting Started: Healthie Calendar
Deep dive: Appointment Types (Enabling / disabling clients to book)
Group Video Chats And Webinars: Zoom Integration with Healthie